
|
Welcome to the iScore Football tutorial
|
|
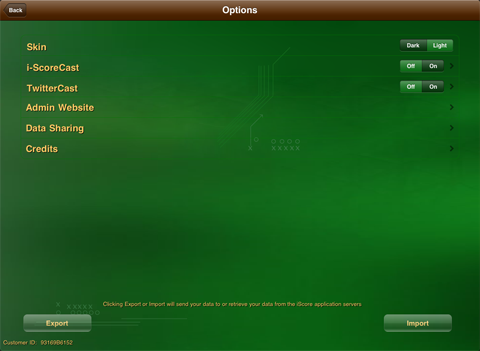
Press the Options button in the iScore main menu to see the iScore Options screen. Change the color of the interface between dark
and light by tapping on the Dark/Light selector. Tap i-ScoreCast to see the information the viewers will need to view your scorecasts.
You can then turn i-Scorecast on and off using the Off/On selector. Set up your Twitter information so that you can tweet updates from the main
scoring screen during a game. Tapping the Admin Website item will give you the information you need to log into your Admin Website.
Data Sharing allows you to transfer data between devices.
The Export button at the bottom can be used to backup your data to the iScore servers to prevent data loss in case of
catastrophic failure of your device. We recommend exporting your data after every game.
|
|
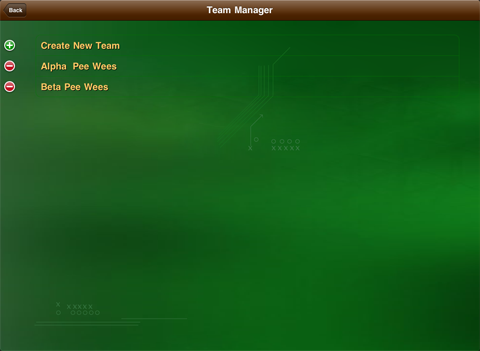
From the iScore main menu screen press 'Team Manager' to add, edit or delete teams. Although you can create teams on the fly
at game creation time, it is sometimes easier to set your teams up beforehand in Team Manager. Press 'Create New Team' to create a new team.
|
|
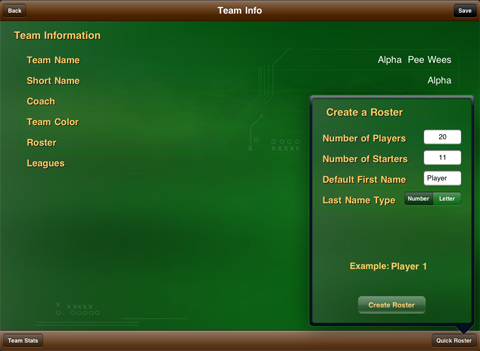
The Team Info screen is the place to enter and edit information about a team. Start by entering the Team Name, Team Short Name and Team Color.
Although, the Team Short Name and Team Color are optional, they can often be a helpful cue when scoring a game and they
can make the scorecasts more visually appealing to the viewers.
In the bottom left is the Team Stats button. Touch this button after scoring several games to view and email your cumulative season stats.
In the bottom right you will find the Quick Roster button. This can be used to quickly generate an opposing team with default player names
and numbers.
Touch the Roster item to view the team's roster
|

|
The Roster screen keeps a list of all players on a team.
Press the red circle to the left of a player's name to remove the player from the roster. Removing a player from the roster does
not delete the player from the system. The player can still be accessed in Player Manager and will still be available for adding
to another team.
The order of the players can be changed by dragging up and down on the icon
that looks like three horizontal bars to the far right of a player's name.
Press 'Add a Player' to add a player to the team's roster.
|
|
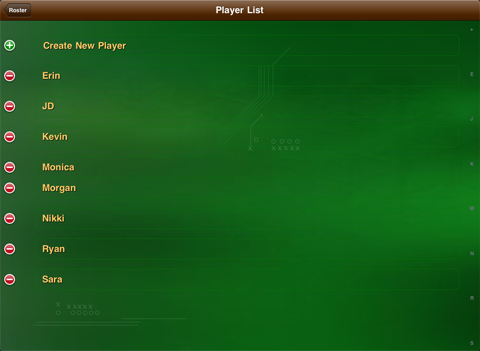
After pressing 'Add a Player' you will be taken to the Player List screen. If the player you wish to add already exists in iScore,
select that player from the list. If the player does not already exist, press 'Create New Player'
|
|
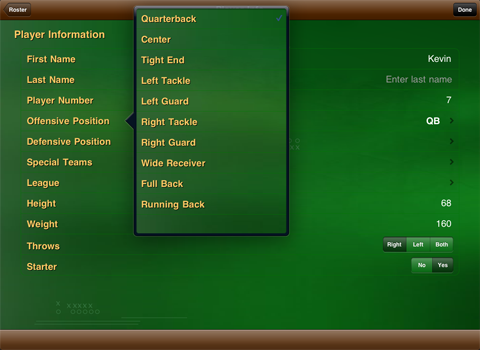
Pressing 'Create New Player' in the Player List screen or selecting a player from the Roster screen will take you to the Player Info screen.
Here you can enter the name, number, height, weight and positions that the player plays. Put a checkmark next to each position that a player might play.
|

|
Once you have created and populated the teams it is time to create a game. From the iScore main menu press the 'Game Manager'
button to get to the Game
Manager screen. To create a new game press the 'Add' button in the upper right.
|

|
Select the visitor team and the home team by tapping on the 'Visitor Team' or 'Home Team' item. In the Team List that appears you can either
select an existing team
or create a new team. You may also select the game options such as number of quarters and length of quarter by tapping the 'Options' item.
Touch Done in the upper right to create the game
|
|
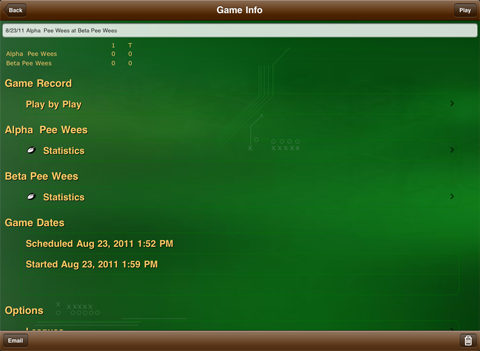
After the game is created you will be returned to the Game Manager screen.
Tap on the newly created game to go to the Game Info screen. At the top of the Game Info screen
is the name of the game. The game name can be editted by tapping the text area. Press Done in the keyboard to save the name of the game.
The Play by Play item will show the play by play listing of the game after the game is complete. The stats for home and visitor
will also be populated after game data has been entered. Game Dates can be editted by tapping. Scroll to the bottom of the page to see the i-Scorecast Synchronize item.
Normally this item will not need to be used but you may need to tap it if you switch scorecasting on after a game has already started or if
you did not have a good network connection for part of the game.
At the bottom you will find a button to send emails of your stats to any email address and a trashcan button if you wish to delete a game.
To begin scoring a game press Play in the upper right.
|
|
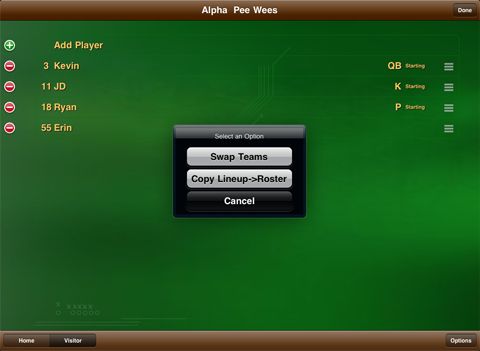
The Lineup screen will initally be populated with the players who were in the roster for the selected teams at the time the game was created.
You can add or delete players from the Lineup for the game at any time. The steps are similar to those used to add and delete players
from the Roster.
Switch between Home and Visitor teams using the switch in the bottom left. Press the Options button in the lower right
to swap home and visitor teams before the game has started or copy the players in the lineup back to the roster if the lineup has
new players that you wish to include in the roster.
Some people like to have all players already entered in the Lineup before the game begins. Another option is to just add
the quarterback, punter and kicker. The reason to add these three players is that iScore will automatically select the first players
assigned to these positions when generating new plays in the scoring screen. The other players can be created on the fly as the game progresses.
|
|
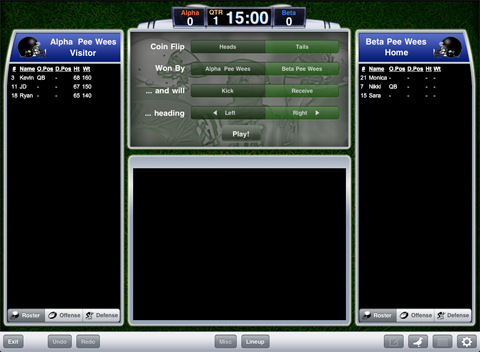
To start the game, choose who won the coin toss, whether the winning team selected to kick or receive and the direction of play.
Press Play! when the kicking team kicks off.
|
|
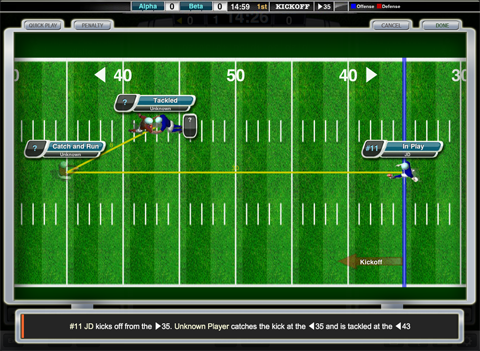
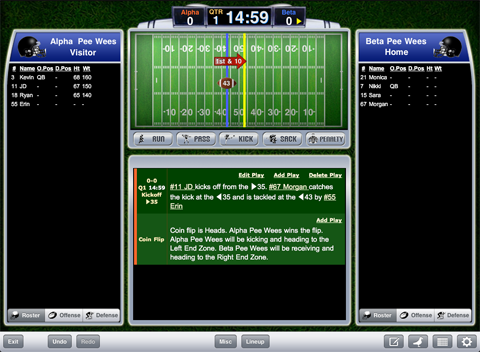
Pressing Play will take you to Play Edit screen. Since this is the kickoff, the most common kickoff scenario has alreay been set.
If you created a kicker in the Lineup screen for the kicking team, you will see that the kicker's name has already been assigned for you.
Notice that a description of the play is also created below the field.
|
|
Although iScore presets the kicker based on how the lineup was configured, it does not know who caught the kick. A '?' in the
player info indicator shows that a player has not been set.
Tap on the player icon that says 'Tackled'. You will see that you can now
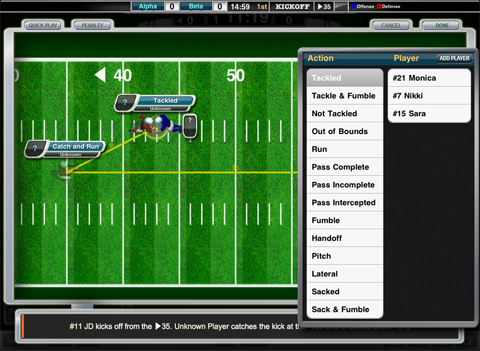
select the player or even change the action that occurred. We will leave the action set to 'Tackled' and then select the player who was tackled.
Since the player who caught and carried the ball is not currently in the list of players, we will add a player on the fly. Press 'Add Player' in the upper
right of the Player Modifier dialog.
|
|
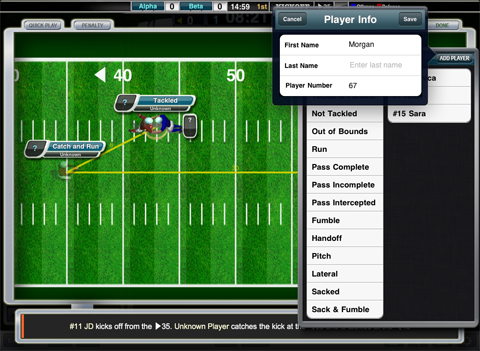
The Player Info dialog appears, allowing you to add any information you know. Generally you will only be able to see the player's jersey number,
and it is fine to only enter that number in the dialog. Press Save and you will see that the new player has been added and is selected.
You will also notice that the player icon that says Catch and Run has also been updated to reflect the new player. Continuation events, where
multiple icons represent the same player, will all be updated with the correct player name when one of them is updated.
|
|
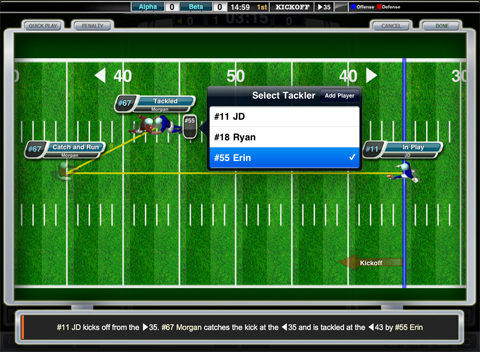
The final play information you may want to set is the tacklers. Touch the small black icon behind the tackler image to display the tacklers
dialog. You can select one or multiple tacklers and you can add new players using the 'Add Player' button.
Be aware that setting any of the player information is optional. When the Play Edit screen was first displayed you could have simply
dragged the icons to the correct spots and selected 'Done' to record the information if you did not wish to record who was involved in the play.
Sometimes you may not know until later who was involved in a play. Simply set the correct location of the icons and the plays can be editted later when the
information is known.
TIP: Double tapping anywhere on the field will move the final player or ball icon to the spot that was tapped. This can save a lot of time when the end of the play is far downfield.
Press 'Done' in the upper right to return to the Scoring screen
|
|
You will see that the new play has been added to the Play by Play list.
Names in the Play by Play list are underlined to let you know that you can change the player right from the scoring screen by tapping on the player name.
You can also Edit or Delete the play by touching the Edit or Delete links in the play listing.
Add new plays by touching the Run, Pass, Kick, Sack or Penalty button in the main Scoring Screen. Press Run now.
|
|
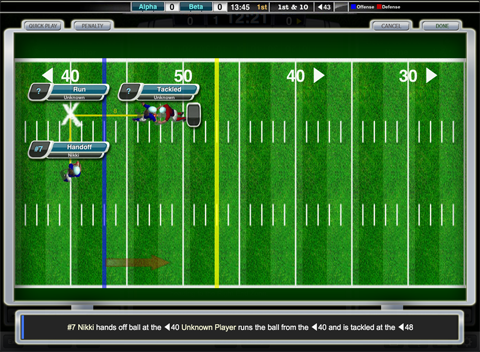
One of the most common running plays, the handoff, is created by default. If a QB was set in the Lineup, that player will already
be selected for you.
You will notice that the QB and runner are positioned behind the line of scrimmage
(blue line) to reflect how typical running plays are executed. When this play is scorecast to the servers, the viewers will get a more accurate understanding
of how the play unfolded.
Regardless of where you start the runner behind the line of scrimmage, the stats will be correctly calculated based on the line of scrimmage.
Recording this play is as simple as dragging the 'Tackled' icon to the correct spot on the field (or double tapping the spot where the icon should go) and optionally setting the runner and tackler names.
The yellow line represents the first down yardline.
|
|
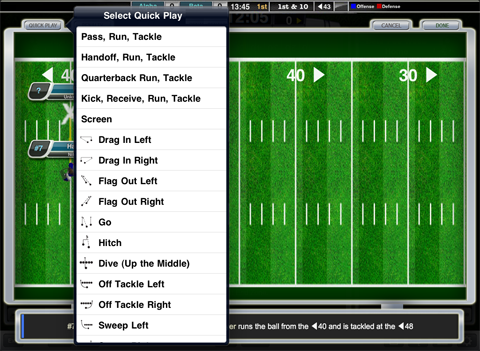
The handoff can be used for most running plays and the stats will be correctly calculated even if the play was actually a pitch, lateral etc.
For those who feel comfortable with the default plays, there is also the ability to select Quick Plays. Tap the Quick Play button in the upper left to display
a list of the available quick plays and then select one of the plays. As with any other type of play, simply drag the icons to the correct locations on the field to accurately reflect the play
and optionally set the players. If the default play or the quick plays do not cover the action that occurred on the field, you can always customize the play by
tapping an icon and setting the action manually.
|
|
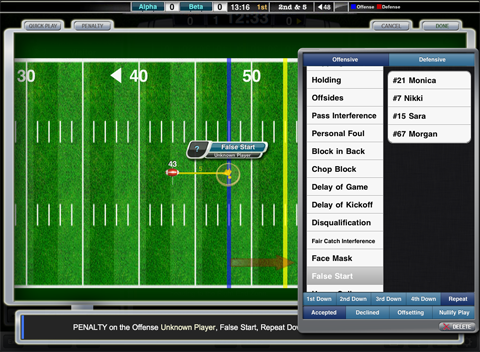
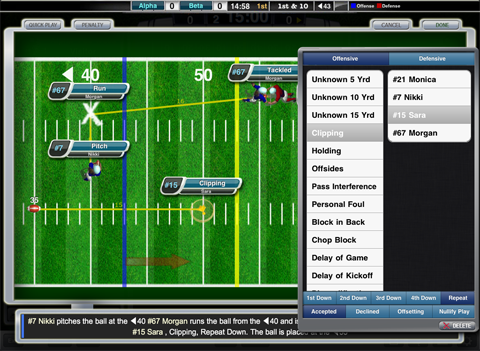
Penalties can be set at any time. If the penalty occurs as a result of a play then press the Penalty button
in the upper left of the Play Entry screen. If a penalty such as Encroachment occurs before the play begins, press the Penalty button on the main
scoring screen to record a stand alone penalty.
The Offense/Defense switch at the top of the Penalty dialog determines the side against which the penalty is charged.
Below that you can select the type of foul and player who committed the foul. If you do not know the exact type of foul you can select
Unknown 5, Unknown 10 or Unknown 15 when you see the distance the ball was moved. At the bottom you can select the down that resulted from the penalty
and whether the penalty was accepted, declined, was an offsetting penalty or nullified the play.
|
|
Place the penalty marker at the point of enforcement. For many penalties the point of enforcement is the previous spot (line of scrimmage or spot of kickoff)
and is where the marker is placed by default. For penalties where the point of enforcement is different from the previous spot, drag the marker to the point of enforcement.
After selecting the penalty type, the football icon will be placed at the point to which the penalty is assessed.
This point can be adjusted by draging the football to a new location.
A penalty can be deleted by pressing the Delete button on the Penalty dialog window.
|
|
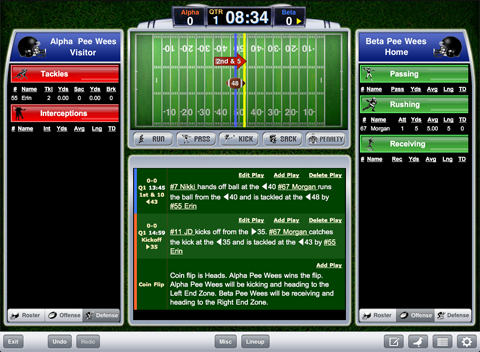
As you record plays, the players will begin to accrue stats. You can keep track of some of the basic stats on the main scoring screen
by pressing the Offense or Defense selectors at the bottom of each team's player list.
|
|
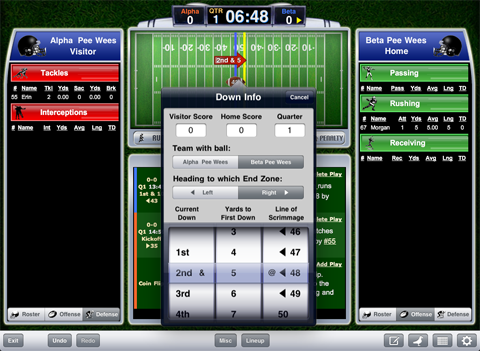
Manual adjustments to the score, quarter, possession, direction, currect down, yards to first down and line of scrimmage
can be made at any time by tapping on the football field in the main scoring screen. This can be very useful in many situations. For example, if you only wish to
record your own team's offensive drives, use this feature after the drive is complete to set up the next sequence of plays.
The Misc button at the bottom of the
scoring screen can be use to easily flip directions if a direction change occurs between quarters. There is also an option to set up a new kickoff at halftime
|
|
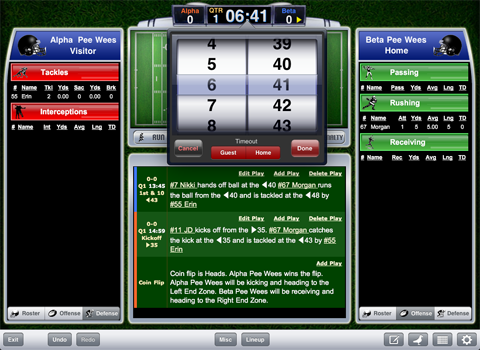
The clock can be paused at any time by tapping on the clock in the scoring screen. The clock can be adjusted at any time by double tapping
on the clock in either the Main Scoring screen or the Play Entry screen.
At the bottom right of the scoring screen you will find buttons that will allow you to take notes, tweet the current state of the game (if Twittercast is turned on),
view full game stats and set game options.
Always remember that you can record as much or as little of the action as you want. Plays are very easy to edit so if you miss some of the action during
a complex play, you can always return to add additional information later. If the other team's stats aren't important to you then you may not even need to enter players into the opposing team's Lineup.
If you have any additional questions after viewing this tutorial please email us at support@iscoresports.com
|